
3 Tie Knots Every Man Needs to Know
For men who wear ties every day for work or even just throw on a Baltimore tie after a big Ravens win, it is fun to know different ways to tie your tie in order to switch it up. Four of the easiest tie knots that every man needs to know how to tie include the Full Windsor, Four-In-Hand and the Half Windsor. Experiment with each and find the one that best fits your style.
Before you attempt to learn these knots, here are a few, basic things you need to do beforehand:
- Secure the top button of your shirt and raise the collar
- Drape the necktie around your collar with the wide end on your right side, seams facing down
- Pull the wide end down so it hangs around your thigh
Now you are ready to try these 3 knots.
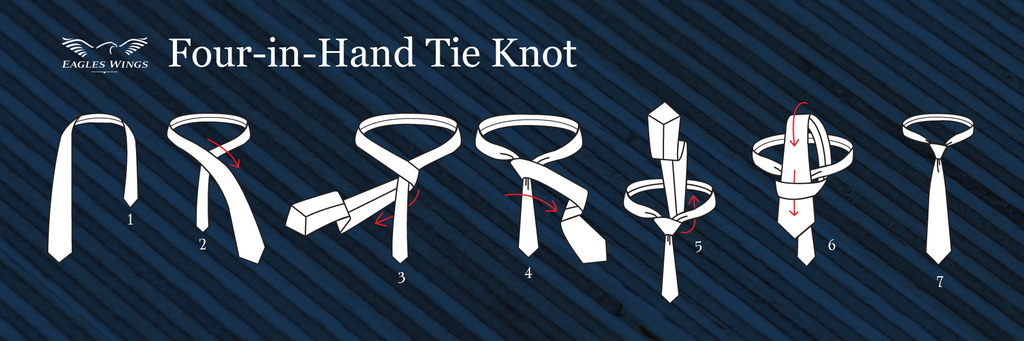
Four-in-Hand Tie Knot
Not only is the four-in-hand knot the oldest tie knot around, it is also believed to be the easiest one to learn. The knot supposedly originated with British horsemen, who were tying scarves while holding onto the reigns of four different horses in their other hand. This particular knot is ideal for tall men, as it requires less of the tie’s length. Additionally, the knot itself is small and long in shape, making it perfect for narrow collars. Here are the steps you’ll need to tie the four-in-hand knot:
- Starting with the wide end of the tie on your right side, make sure the smaller end is slightly above your belly-button.
- Move the wide end over the narrow end, off to the left side.
- Bring the wide end of the tie under the narrow end, ending with the wide end back on the right side.
- Tuck the wide end of your tie around the back of the loop that was just created.
- Pass the wide end of the tie through the space that is located between the necktie and the shirt collar.
- Continue passing the wide end down through the front of the knot loop that you’ve just created.
- Tighten the knot by pulling down on the wide end. Slide the knot up and adjust it using the base of your thumb and forefinger.
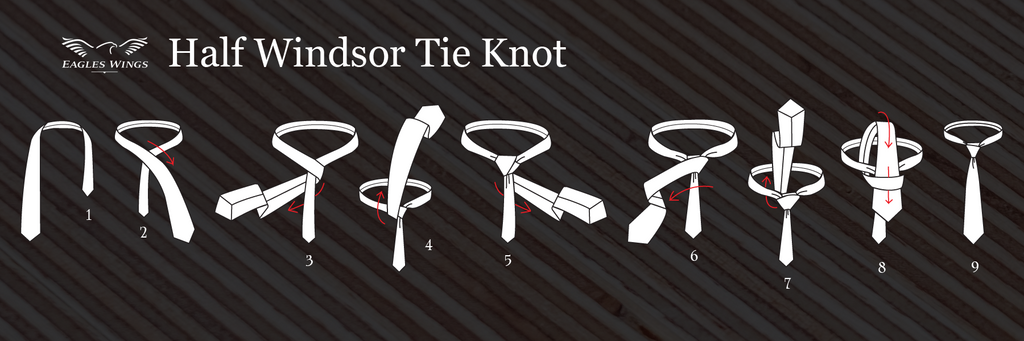
Half Windsor Tie Knot
The half Windsor tie knot is perfect for tie tying beginners. This particular knot is ideal for medium-width and tick ties. It is also the most versatile and popular knot. Here are the steps to follow in order to master the half Windsor tie knot:
- Starting with the wide end of the tie on your right side, make sure the smaller end is slightly above your belly-button.
- Cross the wide end of the tie in front of the narrow end, over to the left. This will create an X-shape below your chin.
- Take the wide end and loop it horizontally around and behind the thin end.
- Take the wide end over from the top and through the opening of the X-shape that was created in step 2.
- Holding the wide end of the tie with your right hand, wrap it in front over the thin end from your right over to the left.
- Bring the wide end of the tie towards your chest and from behind the loop, pass it over the X-shape at the center from behind.
- Using the index finger of your left hand, create a space in the triangle that you have created over the X-shape. Pass the wide end of the tie through the loop created, pulling it completely through.
- Your tie knot is now created. Holding the knot, pull down on the wide end until the knot becomes taut.
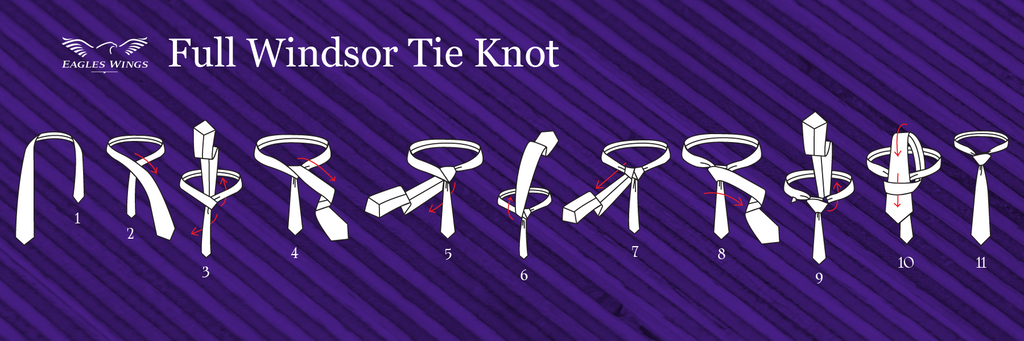
Full Windsor Tie Knot
The full Windsor knot is perfect for widespread collars or men with large necks, as it has a large, triangular shape. Here are the steps necessary for the full Windsor knot:
- Starting with the wide end of the tie on your right side, make sure the smaller end is slightly above your belly-button.
- Cross the wide end of the tie in front of the narrow end over to the left. This will create an X-shape below your chin.
- Tuck the wide end of the tie up and beneath the loop around your neck, coming out point-up behind your newly created X-shape.
- Pull the wide end of your tie all the way down, making sure that the X-shape and the loop that you have recently formed are snug and tight.
- Bring the wide end of the tie around behind the knot. Pass it horizontally from the right side over to the left side.
- Flip the wide tip end of the tie upward and tug it diagonally across the front of the knot.
- Loop the wide end of the tie over the top of the loop around your collar, bringing it back down, on the left side of the thin end of the tie. At this point, the wide end of the tie should be pointing tip down with the seam facing out.
- Bringing the wide end horizontally across the front of the knot, moving from left to right, you’ll end up with the top pointed to the right side, seam facing inward. This will then create a horizontal band across the front of the knot.
- One more time, bring the wide end underneath the loop, around the collar with the tip pointed upward, seam facing outward.
- Turn the wide end of the tie downward and slide the tip through the loop that you created in step 8.
- Carefully pull the wide end of the tie down all the way, smoothing out any creases or slack within the knot. Adjust the knot by holding onto the knot with your thumb and forefinger, while gently pulling down on the thin end of the tie with your other hand.